Gif Take on Me Hip Thrust Gif Funny
The first rule of hip thrusting: Never make direct eye contact while hip thrusting or when someone else is hip thrusting…things can get awkward rather quickly.
Don't Be This Creep!
At this point, many lifters, especially my readers, believe the hip thrust to be the best glute development exercise. However, the hip thrust also activates the hamstrings, quadriceps, and adductors very thoroughly as well. Therefore, it will help develop the entire thigh musculature. Throughout the movement, the glutes stay under constant tension, and back strength is not a limiting factor, which cannot be said of other popular glute building movements. This allows for maximal loading of the glute musculature.

Tim Tebow knows what's up
The hip thrust can be performed for a variety of different reasons. Although the popularity of the hip thrust is rising, I still feel its importance is underrated for aesthetics, athletic development, and absolute strength.
The four primary reasons one should perform hip thrusts include:
- Improve the size, strength, and appearance of the glutes
- Increase acceleration and sprint speed
- Increase bottom squat and deadlift lockout power
- Improve functioning of the entire body since the glutes influence foot, ankle, knee, hip, pelvic, and low back mechanics
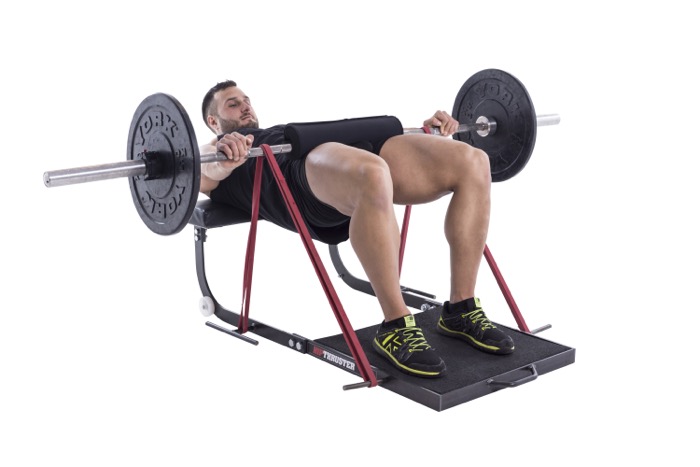
The Hip Thruster is the best way to do the hip thrust – stable and versatile!
Ways to load the hip thrust
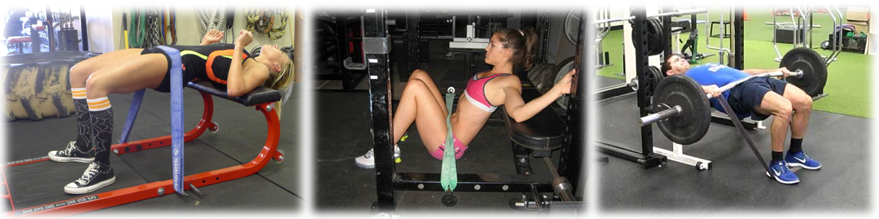
Below are the most common ways to increase the challenge of the hip thrust after mastering bodyweight:
- Barbell
- Band
- Sandbag/Chain/Kettlebell/DB (chain variation shown)
- Single Leg Variations
- Shoulder and Feet Elevated Variations
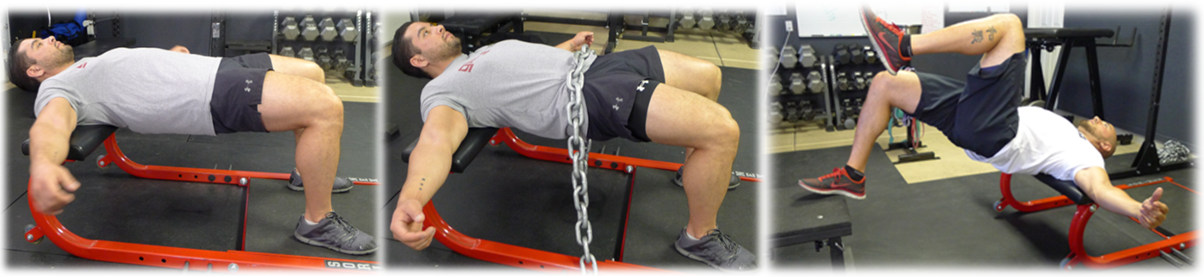
Left: Bodyweight, Center: Chain Loaded, Right: Single Leg with foot elevated
The Set Up
Bench Height
Through experimenting with different bench heights, I believe the optimal bench height is around 16 inches. This is what most clients feel most comfortable with which is why I designed The Hip Thruster to be this height. Taller individuals might feel more comfortable with a taller bench and shorter lifters with a shorter bench. In general, a range of 13″-19″ will satisfy 99% of lifters. I recommend that you experiment to figure out a height that allows for an easy set-up and a height that allows you feel the most activation in the glutes.
For the regular hip thrust, set up in a position with the bench lined up at around the bottom of the shoulder blades.
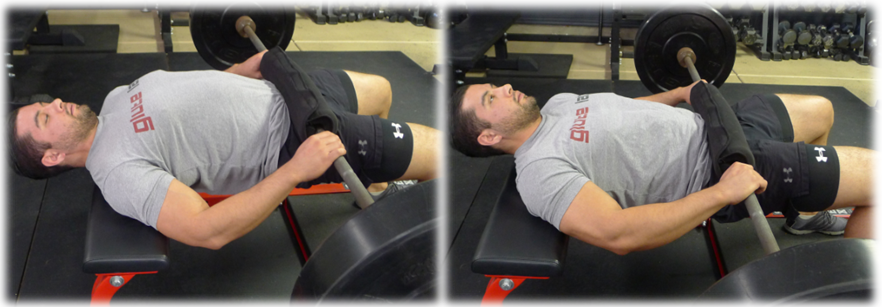
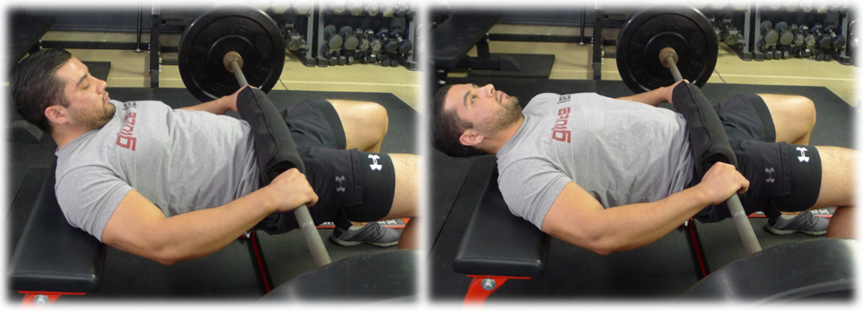
For the American style hip thrust, the pivot point is lower on the back. With the American style, many lifters will find that they can lift heavier weights. However, some lifters won't be stronger with this variation and must use lighter weights. With the American version, you are going to set up with the mid back on the bench. With this variation, many find that less pressure is placed on the back, and most feel more loading on the glutes. The movement is performed with a posterior pelvic tilt which natural occurs when placing the back on this position. We've tested three lifters so far in gluteus maximus EMG and have found in all three individuals that glute activation is higher with the American version.
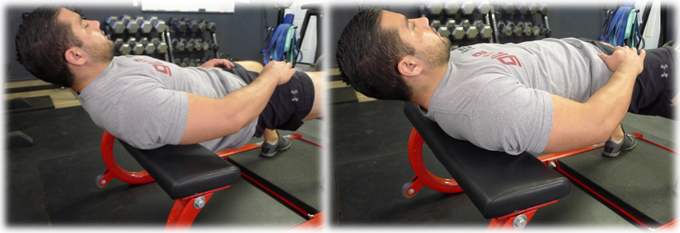
Left: American Hip Thrust Set-up, Right: Regular Hip Thrust Set-up
For both variations, make sure your back acts as a pivot point around the bench. Do not allow your back to slide back and forth during the movement!
Bar Position
To the get the bar in proper position, simply roll it right over the feet if using standard size Olympic plates. For those who are just starting out and cannot use 135 lbs, it makes it difficult to get into the starting position. This is where bumper plates become useful since they are the same diameter as standard Olympic size plates, which allows the lifter to roll the bar right over the thighs to get into position. The smaller plates make it impossible to roll the bar over the legs onto the hips. If this is the case and you do not have access to bumper plates, you have two options. First, you can have a partner lift the bar and gently place it over the hips for you. Second, you can deadlift the bar up and sit on the bench, then move down to the ground. Kellie Davis does a great job of demonstrating solutions in THIS blogpost.
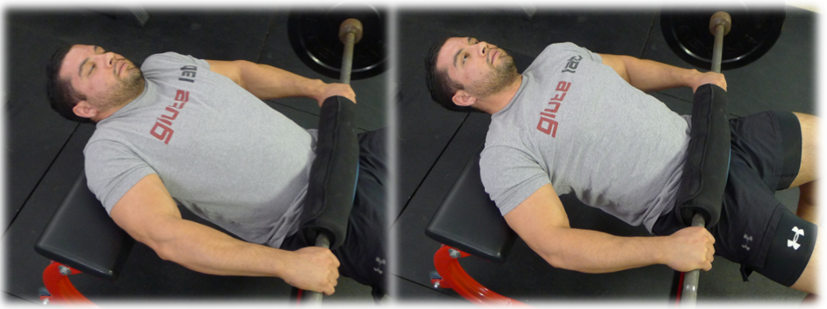
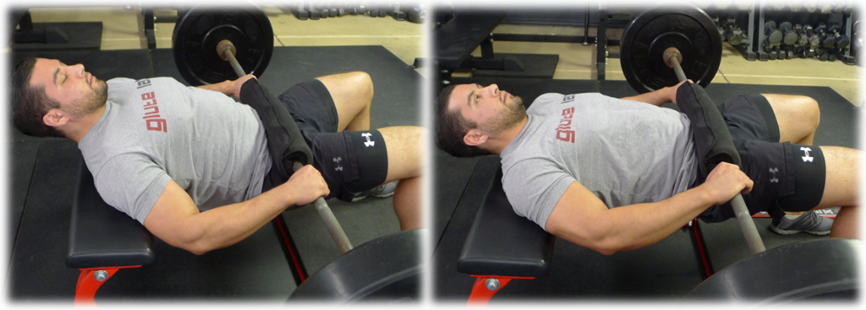
Left: Improper Shoulder Position Shrugging, Right: Shoulders Relaxed
The bar should be positioned in the crease of the hip with the hands holding the bar into position throughout the movement so the bar does not move forwards or backwards. Be sure to keep the shoulders down and prevent shrugging when holding the bar. Some feel more comfortable with a supinated grip (some claim this helps improve lat function which subsequently leads to better glute function), while others prefer a pronated grip. This is entirely up to you. Do not let the bar slide forward or backward during the hip thrust – keep it centered over the hips!
Band placement is going to be the same as bar placement on the hips. For those of you who are lucky enough to have access to a Hip Thruster, the band placement is simple. For those of you who aren't so lucky, you have to become a little bit more creative. Below are two possible options to set-up the band hip thrust without using the Hip Thruster. Options include using the band peg placements in a power rack and looping a band around a bar and then stepping on the band (obviously this requires band plus bar tension, and since the bands aren't centered at the hips, it's not as effective). I have also seen a set up whereby heavy dumbbells anchor the band down, but this option limits the band tension to the sum of the dumbbells used, so if 120 lb dumbbells are used, then the band tension cannot exceed 240 lbs or else the dumbbells will rise off the ground.
Protecting Your Hips
Heavy hip thrusting is brutal on the hips. While some lifters can tolerate hip thrusting without any padding, most will find the lift excruciatingly painful if padding isn't used. Even worse is that pain will shut down muscle activation and prevent the glutes from receiving an optimal training stimulus.
There are a few different ways to protect your hips and make the hip thrust comfortable. Below I have listed the most popular ways to pad the bar. If you currently do not have access to any of these, I recommend investing in one of them, as it makes the movement much more comfortable. Many lifters are shocked when they finally decide to purchase padding and remark as to how much better their glutes fire when they hip thrust pain-free. Other options such as rolling up a exercise or yoga mat or using a thick towel wrapped around the bar can indeed work, but they are not as effective. You can find these items on Amazon or through a Google search:
- Hampton thick bar pad
- Airex Pad
- Squat Sponge (this is currently our favorite option – it should be called the hip thrust sponge!)
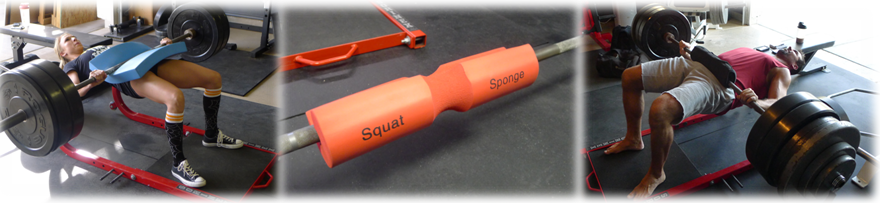
Left: Airex Pad, Center: Squat Sponge, Right: Hampton Thick Bar Pad
Feet
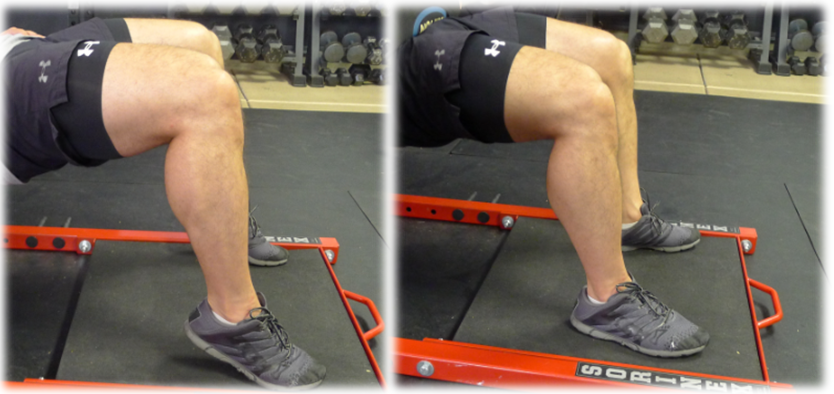
Once the bar is set over the crease of the hips you will need to get your feet set in the proper position. Bring your feet up towards your butt and "screw" the feet into position. This may be difficult depending on the thickness of the pad you are using and depending on your body size, but you want to "get tight" by wedging the body into proper position. Set your feet so that at the top of hip thrust, when the hips are fully extended, your shins are vertical. Sometimes the shins won't be vertical and will have a slight angle, but in general you want to limit this. Toes can be pointing straight ahead or turned out slightly. Tinker around to find the foot position that allows you to feel the most glute activation.

Left: Correct Vertical Shins, Right: Incorrect Negative Shin Angle
Execution
While performing the hip thrust, it is important to make sure you do not jerk the weight off the floor but use a fluid motion instead. I can't stress this enough – you want a smooth hip thrust, not a spastic hip thrust. Once you follow the steps above and are in the correct starting position, take a deep breath, brace the core, and drive through the heels, keeping the knees in line with the toes
- Focus on moving the weight with the glutes and not the lower back or hamstrings
- When you approach the top of the movement, finish the lift by contracting your glutes hard and pushing your hips forward. Do not overextend the lower back
- Finish the movement with your hips as high as possible while maintaining a neutral spine. At the top of the movement your torso should be parallel to the ground with hips pushed through
- Lower the weight under control keeping tension on the glutes
- Repeat for desired number of reps
Repetitions can be performed by touching the floor on each rep or by reversing in mid-air. There are benefits to both options. By touching the floor on each rep, you can "reset" each rep and you ensure that you're using full hip ROM. However, by reversing in mid air, you keep constant tension on the glutes which can lead to greater burn and a better glute pump. Some lifters, especially shorter lifters or those with shorter torsos relative to their leg length, will find that the mid-air reversal is much more comfortable for their bodies. There's nothing wrong with reversing in mid-air. Many women prefer this option, whereas many men prefer to touch the ground on each rep. Tinker around to find what works best for you.
Common Hip Thrust Mistakes
Excessive arching of the low back
This usually occurs because the weight is too heavy. The glutes aren't strong enough to lock the weight out so the lifter substitutes by arching the back. A more detailed article on this topic can be found by clicking HERE.
Left:Poor Overextended Spine, Right: Good Neutral Spine – Notice Flat Torso
Quick Fix: Reduce the load and brace the core throughout the whole range of motion. Focus on only moving at the hips and on not allowing movement to occur at the lumbar spine.
Improper neck positioning
Going into cervical flexion can be problematic for some lifters, causing cramping and neck discomfort.
Left:Poor Flexed Neck, Right: Good Neutral Neck
Quick Fix: Be sure to maintain a neutral neck position throughout the movement
Insufficient hip extension
Failing to reach full hip extension is also usually due to the load being too heavy. This can also happen on account of extremely tight hip flexors.
Left: Poor – Failure to reach full hip extension, Right: Good full hip extension
Quick Fix: Drop the weight, allowing you to completely lock out and finish the movement. Also some static or dynamic stretching of the hip flexors (especially the rectus femoris) before or in between sets can help.
Rising up onto toes
This typically occurs with people who don't know how to perform the movement properly and with those who are very quad dominant
Left:Poor – Rising onto toes, Right: Good – Feet flat driving through heels
Quick Fix: Keep your toes on the floor and focus on pushing through the heels throughout the set (you can also dorsiflex and lift the toes if this helps)
For a more in longer in depth look at the hip thrust check out this video:
To see the evolution of the hip thrust, including all the different exercise variations possible, click on THIS link. To read up on the science behind the hip thrust, click HERE.
At this point, you should have a sound understanding of how to perform the hip thrust and of what is considered proper form and technique. There should be no more excuses for a lack of glute development. Pick your glute building poison and get to work.
Source: https://bretcontreras.com/how-to-hip-thrust/
0 Response to "Gif Take on Me Hip Thrust Gif Funny"
Post a Comment